Sub-process
The web designer enables to process the case of the sub-process table by adding a “sub-process table” field-type to a task. You must enter:
- The system name of the child process to use;
- The system name of the application in which the child process has been generated;
- The system name of the associated view.
A new line can be added using the “Create” button. When this button is activated, the creation wizard is called. On validating it, a “linked sub-process” is created and associated to the main document.
Defining a sub-process table row
A sub-process table row is a IWorkflowInstance linked treatment-type. A “dynamic table” field is a collection of IWorkflowInstance objects.
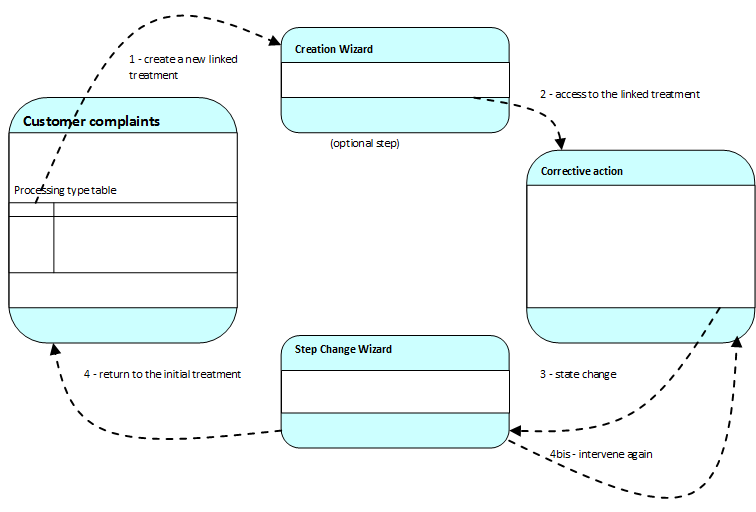
Conceptual diagram
This diagram gives the linking of screens. The customization and the subscriptions are valid in this context.
Activate/Deactivate the wizard of linked documents creation
Process permits you to activate or not the wizard of linked documents creation.
The way of managing the activation of the creation wizard is the same whatever the call context. From a parent document or from the portal, the wizard will respond in the same way: it will be activated if there is at least one field tag in the customization document of the CREATE_DOCUMENT form. In the contrary, if no field is specified, it won’t be displayed.
Every extension and JavaScript codes present in the form will be taken into account and executed even if the wizard does not display.
It is also the indicated place to define values by default on some document fields on creation.
Step Change Wizard
In the same way as the creation wizard, if no field tag is displayed in the action customization form, the step change wizard will not be displayed to the user.
The JavaScript code and extensions will be executed, then the report page will be displayed.
Customization of the report page
The report page enables to display the list of the next contributors by step (in the case of parallel steps) and/or the list of the next steps (without the contributors). Since these displayed information are sometimes not wanted, Process offers the possibility to customize this report for the integrators.
It is possible to define the “TRANSITION_REPORT” property on the coreDocument object not to display the report when automatically executing an action.
Available options:
- “autoTerminate” click the End button and close the wizard;
- “autoContinue” click the Next button if it is displayed to re-open the document, otherwise display the report;
- “hideContinue” hide the Next button and the associated text if needed;
- “hideActors” hide the contributors list for each activity;
- “hideActivities” hide the list of activities and so the users too.
These values may be cumulated when separated by commas.
Example: “autoContinue, autoTerminate” click the Next button if it is displayed to re-open the document, otherwise click the End button and close the wizard.
This property may be allocated in a Java extension class or in an action form JavaScript or on a resource template.
Example of value position for the customization of the step change wizard report
<script>
        coreDocument.setContext("TRANSITION_REPORT","autoContinue,autoTerminate");
</script>
Managing table buttons
Using customization attributes
Several keywords are available to activate or not the table buttons.
| Key word | Description |
|---|---|
| allowcreate | Enables to activate or not the creation button. |
| allowremove | Enables to activate or not the deletion button. |
| alloweditchild | Enables to define if the user may edit. |
| allowreadchild | Enables to define if the user may display a table row. |
| allowselectchild | Enables to indicate if it possible to select elements. |
| securecreation | Enables to indicate the creation button will be displayed only if the connected person has the creation rights on the child elements needed of the child process. |
| securedeletion | Enables to indicate the deletion button will be displayed only if the connected person has the deletion rights on the child elements. |
| elementsperpage | Number of elements displayed by page |
Example of using table attributes
<section labelid="Property:DetailDeLaNote:label" display="" class="subsection" descriptionid="Property:DetailDeLaNote:description">
	<line>
		<col>
			<field property="DetailDeLaNote" ctrl="resourcetable" resourcetemplate="DetailDeLaNote" mode="write" required="no" allowcreate="false" allowremove="false">
				<subfield mode="write" required="yes" property="Date" ctrl="date" labelid="TableView:DetailDeLaNote:col#Date#label" />
				<subfield mode="write" required="yes" property="Client" ctrl="text" labelid="TableView:DetailDeLaNote:col#Client#label" />
				<subfield mode="write" required="no" property="Type" ctrl="textselectlist" labelid="TableView:DetailDeLaNote:col#Type#label" />
				<subfield mode="write" required="yes" property="Cout" ctrl="float" labelid="TableView:DetailDeLaNote:col#Cout#label" />
				<subfield mode="write" required="no" property="Commentaires2" ctrl="textarea" labelid="TableView:DetailDeLaNote:col#Commentaires2#label" />
			</field>
		</col>
	</line>
</section>
Interaction with table buttons
Process enables to overwrite the behavior of its fields. So it is possible to respond to the events triggered by a table. Every table implements the interface ITableSupport. Its full name is com.axemble.vdp.ui.core.providers.ITableSupport.
The ITableSupport interface
This interface enables to react to the child elements creation, the single or multiple deletion of elements, or even to the line opening.
public interface ITableSupport {
	boolean onCreateChild( CtlInputTable table );

	boolean onDeleteChild( CtlInputTable table, AbstractDocument child );

	boolean onDeleteChildren( CtlInputTable table, Collection children );

	boolean onOpenChild( CtlInputTable table, AbstractDocument child );
}
Extract of code of dynamic table overwrite (sub-resources)
public class CustomResourceTableField extends ResourceTableField {
	public boolean onCreateChild( CtlInputTable table ) {
		return super.onCreateChild( table );
	}

	public boolean onDeleteChild( CtlInputTable table, AbstractDocument document ) {
		return super.onDeleteChild( table, document );
	}

	public boolean onDeleteChildren( CtlInputTable table, Collection document ) {
		return super.onDeleteChildren( table, document );
	}

	public boolean onOpenChild( CtlInputTable table, AbstractDocument document ) {
		return super.onOpenChild( table, document );
	}
}
Once you have coded, you just have to deploy the solution and to define your class as being the one implementing the table behavior in the form corresponding.
Extract of standard code
<field property="DetailDeLaNote" ctrl="resourcetable" resourcetemplate="DetailDeLaNote" mode="write" required="no">
        <subfield ...
</field>
Extract of customized code
<field property="DetailDeLaNote" ctrl="com.axemble.education.document.fields.demo.CustomResourceTableField" resourcetemplate="DetailDeLaNote" mode="write" required="no">
        <subfield ...
</field>